
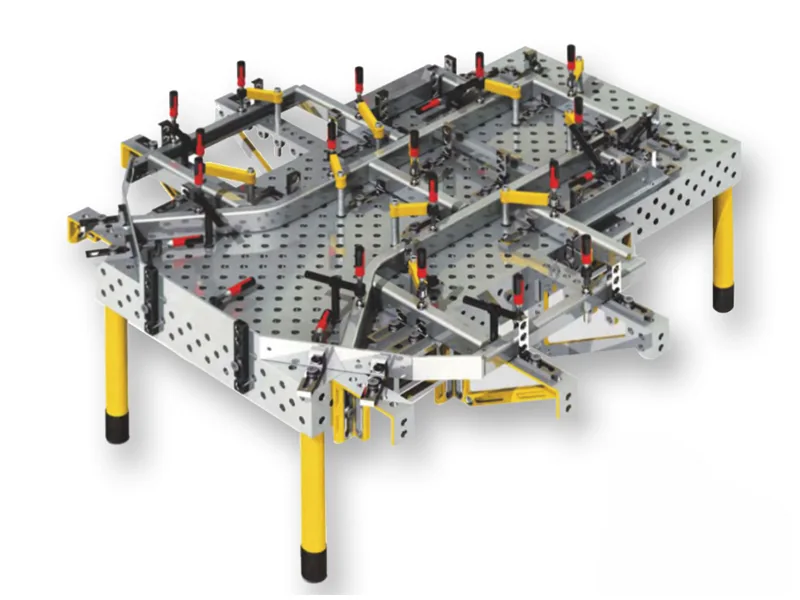
What a welding jig table is
In the shop, "jig table", "fixture table", "modular welding table" and "3D welding table" usually mean the same thing: a heavy steel platform with machined faces and a regular hole grid. The holes are the reference. Every stop, square and clamp drops into a hole, so its position is known and can be repeated.
Strictly, a jig guides the tool and a fixture holds the part, but in welding the words are used interchangeably. What matters is that the table becomes the base of the jig. See welding table terminology for the other names you will see in quotations.
Jig table vs building a dedicated jig
Many shops still cut and weld a dedicated jig for each part. That is the right answer for a part you will make in very high volume over a long run. For everything else, a modular jig table usually wins:
| Dedicated welded jig | Modular jig table | |
|---|---|---|
| Set-up for a new part | Design, cut and weld a new jig | Build from stock components |
| Change for a revised part | Modify or rebuild the jig | Move stops and clamps |
| Storage | One jig per part | A kit of components |
| Repeat set-up | Fixed | Repeatable from a photo or set-up sheet |
| Best for | Very high volume, one part | Mixed parts, batches, prototypes |
Most shops end up with both. Our guide to modular vs dedicated welding fixtures gives a decision list by product mix.
How to choose a welding jig table
1. Size from your largest part
Take your largest common part and add room around it for clamps and the welding torch. If the long parts are rare, two tables joined end to end can be better than one oversized table. See how to choose welding table size and height.
2. Pick the hole system from your parts
D16 for small parts and thin sheet, D22 for mixed fabrication, D28 for heavy frames and thick plate. All jig components must match the system, so this choice fixes your tooling for the life of the table.3. Choose the surface
A nitrided surface is harder and resists spatter and rust, which keeps the holes clean and the jig accurate longer. A machined steel surface is the straightforward choice for general work.
4. Decide platform height and frame
A 200 mm platform gives more side-face area for building jigs up the sides of the table. Fixed legs with levelling feet suit a permanent jig station; castors suit a table that moves between cells.
5. Start with a matched jig kit
A table on its own holds nothing. Order a starter kit of clamps, angle squares, stops and connecting pins in the same hole system, then add single items as repeating jobs become clear. See clamps and fixtures and which accessories to order.
Welding jig table plans or a machined table?
Search results are full of welding jig table plans for drilling your own plate. A home-built drilled table can work for hobby and repair work. For production, the difference is in the machining: a 3D jig table has its top and side faces machined and its holes bored on a regular grid, so a component moved from one hole to another lands where it should. That is what makes a jig repeatable from part to part and from one shift to the next.
A drilled plate also has no machined side faces, so it cannot hold work square in three directions. If you are weighing the two, our guide to 2D vs 3D welding tables covers the difference.
Typical jigs built on a jig table
- Rectangular frames and machine guards, squared with angle squares and stops.
- Brackets and small assemblies, located with pins on a D16 grid.
- Machine bases and structural frames on a D28 table.
- Railings, gates and repeat architectural parts.
- Robot welding fixtures, where the same jig must be rebuilt exactly; see fixture tables for robotic cells.
To make the second part identical to the first, record each set-up. See repeat set-ups.
Send a drawing for a quote
The fastest way to a firm quotation is a drawing or a sketch with dimensions. Include the parts you want to jig, so the table size, hole system and starter kit can be matched to them. Upload it through the contact form or email it, and we will reply with a configuration and a quotation. Standard sizes usually produced in about 10 days after drawing approval; custom sizes are confirmed on the quotation.
Distributors and resellers who want to stock BECO tables and tooling can see the terms on the distributor page.